Before anything: Recent distros come with packaged utilities for encrypting a disk, partition, USB stick or whatever block device. This little cookbook is for those who are not that lucky, or prefer to do things with their bare hands. If you’re not familiar with using loop devices, I suggest playing a bit with them before going for the encrypted version. Because the whole idea behind the mechanism is to wrap the plaintext disk, partition or file with a loop device which does the encryption on the fly.
I’m running an old system, in terms of year 2009: A Red Hat 7.3 with kernel 2.4.21. This is why I was so surprised, when I got the encrypted loop device up and running in no time, despite the fact that it requires some patchwork. I repeated this process, with the same ease on a Fedora Core 9 machine with a 2.6-family kernel.
To be 100% fair, I’ll mention that both machines had the kernel sources properly installed, and with the sane options set. If you’re running on a home-compiled kernel, this will be your case as well.
So here is the quick summary of actions:
Downloaded util-linux-2.12r and loop-AES-v3.2e. Opened tarballs.
Patched the util-linux to support loop-AES. At util-linux-2.12r’s root directory, I went:
This makes losetup, mount and friends to respect the necessary flags. Note that the patch for util-linux is given by loop-AES. This is why downloading two recent versions is a good idea (or the two I mentioned).
Compilation. At the same directory:
CFLAGS=-O2 ./configure
make SUBDIRS="lib mount"
The configuration phase went with some scary messages, but they turned out irrelevant. At this point, I had the relevant utilities as executables in the “mount” subdirectory
If you’d like to compile these as static binaries, this should be typed before anything:
export LDFLAGS="-static"
Next step was to compile the loop kernel module. The whole idea is to replace the existing module with one that supports AES encryption. It means that the kernel is patched, but only the specific module is compiled and replaced. This is a pretty scary approach, but it works. So At loop-AES’ home directory, just go, as root:
make clean
make
I know. I never compile as root. But this one does the work too well. Note that there is no “make install” because plain “make” includes the installation part.
Next I installed the utilities. But I didn’t want to overwrite the original binaries. Why change the existing mount and swapon on a working system? So the idea is to put the executables close to the original ones, only with a “-patched” suffix.
So from the util-linux-2.12r/mount/, I ran as root:
for i in losetup mount pivot_root swapon umount ; do cp $i `which $i`-patched ; done
Ah, before this, I prepared a file called “password”, containing the secret which is necessary to open the encrypted block device. Without the “-p 0″ flag and injecting the password through standard input, the user has to type it manually. Since at least 20 characters are required, the common solution is to let the user type a shorter password, and scramble it into something longer. Of course it’s completely stupid to keep the password on the disk as plain text. You might as well not encrypt anything if you do this.
Played around with the new loop device, formatted it, mounted it with the old “mount”, unmounted, and finally released the loop device (with old losetup)
losetup -d /dev/loop0
That’s it. May look a bit scary, but it was really easy.
I warmly recommend reading the comments at the bottom of this page, many of which go against my point. While I still stand behind every word I said, in particular for web applications (which I believe is the vast majority of MySQL use), the comments below make some valid points, and single out cases where DATETIME actually is the right thing.
Needless to say, this is a discussion, and we’re all free to make our own mistakes.
SQL DATETIME sucks
MySQL, among other databases, has a column type called DATETIME. Its name seems to mislead people into thinking that it’s suitable for storing time of events. Or suitable for anything.
This is a general SQL thing, by the way, but I’ll demonstrate it on MySQL.
I often find this column type in other people’s database schemas, and I wonder if the designer gave it a thought before using it. It’s true, that in the beginning it looks simple:
That was way too cute, wasn’t it? We also have the NOW() function, which fits in exactly, and puts the current time! Yay! Yay! And if the timestamp looks old-fashioned to you, I suppose there is a reason for that.
But wait, there are two major problems. The first one is that the time is given in the host’s local time. That was fair enough before the internet was invented. But today a web server can be a continent away. DATETIME will show you the local time of the server, not yours. There are SQL functions to convert timezones, of course. Are you sure that you want to deal with them? What happens when you want to move your database to a server in another timezone? What about daylight saving time? Local time is one big YUCK.
(Update: As commented below, the real stupidity is to use NOW(), and not UTC_TIMESTAMP(). The latter gives the UTC time, as its name implies)
Problem number two: Most applications don’t care what the absolute time is. The current time is commonly used to calculate how much time has elapsed since a certain event. To filter elements according to if they were X seconds before now. Is the user still logged in? Has 24 hours elapsed since the last warning email was sent? And so on.
“Solution”: The SQL language supplies a variety of COBOL-like functions to calculate whatever we can ask for. And also an opportunity to get things horribly wrong, because the SQL statement became way too complicated.
Use POSIX time() instead
Sorry, didn’t mean to scare you off. It’s really simple: Any modern operating system, even Windows, will readily supply you with the number of seconds since January 1, 1970, midnight, UTC (that is, more or less GMT). This is also called “seconds since the Epoch” or “UNIX time”.
No matter where the computer is, what timezone it uses or what programming language you’re using, this simple integer representation will show the same number at any given moment.
You can, in fact, obtain this number from MySQL directly:
mysql> SELECT UNIX_TIMESTAMP(thedate) FROM stupid_date;
+-------------------------+
| UNIX_TIMESTAMP(thedate) |
+-------------------------+
|              1237118503 |
+-------------------------+
1 row in set (0.00 sec)
This means, that 1237118503 seconds elapsed since the Epoch (which is a global time point) until 14:01:43 in Israeli LOCAL time of the day I wrote this post. So now we have an integer number to work with, which is handy for calculations, but things will still get messy if we try to move the database to another server.
Store the number instead
If we are interested in working with integers, why not store the integer itself in the database? We could go:
That wasn’t very impressive, was it? The first question would be “OK, how do I get this magic number, now that I don’t have the NOW() function?”
The short and not-so-clever answer is that you could always use MySQL’s UNIX_TIMESTAMP( NOW() ) for this. The better answer is that no matter which scripting or programming language you’re using, this number is very easy to obtain. I’ll show examples below.
As for the magnitude of this number, yes, it’s pretty big. But it will fit a signed 32-bit integer until year 2038. I presume that nobody will use 32-bit integers by then.
And finally, one could argue that DATETIME is convenient when reading from the database directly. True. But for that specific issue we have the FROM_UNIXTIME() function:
mysql> SELECT FROM_UNIXTIME(thedate) FROM smart_date;
+------------------------+
| FROM_UNIXTIME(thedate) |
+------------------------+
| 2009-03-15 14:01:43    |
+------------------------+
1 row in set (0.00 sec)
And again, this is given in the computer’s local time. Which is fine, because it’s intended to be read by humans. In particular, humans who easily translate time differences between their server and themselves.
Obtaining Epoch time
Just to prove that it’s easy to know what the “Epoch time” is in any language, here are a few examples. Wherever it’s really simple, I’m showing how to convert this format to human-readable format.
In Perl:
print time();
print scalar localtime time(); # Local time for humans
In PHP:
<?php
echo time();
echo date('r', time() ); // Local time for humans
?>
In Python:
from time import time;
print time();
(note that the time is returned as a float number with higher precision)
In C:
#include <time.h>
#include <stdio.h>

int main () {
  int now = time(NULL);

  printf("%d seconds since the Epoch\n", now);
  return 0;
}
In JavaScript:
<script language="JavaScript" type="text/javascript">
now = new Date();
alert( now.getTime() / 1000 );
</script>
In this case, the time is shown with a fractional resolution.
The JavaScript example is not really useful for a database application, because the time is measured at the computer showing the page. In a website application, this is just anybody’s computer clock, which may be wrong. But it’s yet another example of how this time representation is widely available.
Conclusion
Drop those DATETIME columns from your tables, and use a simple, robust and handy format to represent time. Don’t let the database play around with a sensitive issue like time, and don’t risk getting confused by different functions when calculating time differences. Just because the DATETIME column type exists, it doesn’t mean there is a reason to use it.
Enjoy the database on what it’s best at: Storing and collecting information.
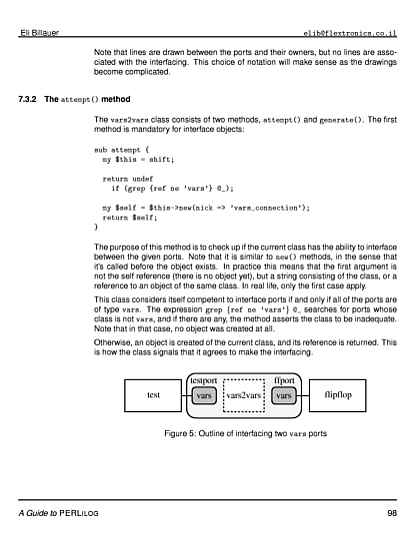
Take a close look on the Verilog code below. This is a plainly-written synchronous ROM. Do you see anything wrong with it? (Spoiler: There is nothing wrong with it. Not that I know of)
module coeffs
  (
   clk, en,
   addr, data
   );

   input clk, en;
   input [9:0] addr;
   output [15:0] data;

   reg [15:0]      data;

   always @(posedge clk)
     if (en)
       case (addr)
     0: data <= 16'h101a;
     1: data <= 16'h115b;
     2: data <= 16'h0f1c;
     3: data <= 16'h0f6d;
     4: data <= 16'hffa4;

... and counting up ...

     249: data <= 16'h0031;
     250: data <= 16'hfffa;
     251: data <= 16'hffee;
     default: data <= 0;
   endcase
endmodule
But it so happens, that Xilinx’ XST synthesizer failed to get this one right. XST J.39, release 9.2.03i, if you insist.
And when I say it didn’t get it right, I mean that what I got on the hardware didn’t implement what the Verilog says it should.
First, what it should have done: Since the address space consists of 10 bits, and there are a lot of, but less than 1024 data elements, the synthesizer should have matched this with a 1k x 18 block RAM, set the values as INIT parameters, and not allow any writes. And so it did. Almost.
The problem, it seems, lies in the fact that only 252 data slots are assigned, leaving 3/4 of the ROM with zeroes. This is where the synthesizer tried to be smarter, for no practical reason. Based upon what I saw with the FPGA Editor, the synthesizer detected, that if any of addr[9] or addr[8] are nonzero, then the output is zero anyhow. Since the block RAM has a synchronous reset input, which affects only the output, the synthesizer decided to feed this reset with (addr[9] || addr[8]). This doesn’t change anything: If any of these lines is high, the output should be zero. It would be anyhow, since the block RAM itself contains zeros on the relevant addresses, but this reset logic doesn’t hurt. As long as you get it right, that is. Which wasn’t the case this time.
What really happened, was that the synthesizer mistakenly reversed the polarity of the logic of the reset line, so it got (!addr[8] && !addr[9]) instead. That made the memory array produce zeros for any address. And the design didn’t work.
It looks like the idea was to reverse the polarity at the block RAM’s reset input as well (which costs nothing in terms of logic resources) but somehow this didn’t come about.
Workaround: It looks like the “default” statement triggered this bug. Since the Verilog file was generated by a computer program anyhow, I let it go on running all the way to 1023, explicitly assigning zeros to each address. This is completely equivalent, of course, but made the design work in real life.
When I first discovered that there is both BLOB and TEXT in databases, I was puzzled. They occupy the same amount of disk space, and the database doesn’t alter the data itself anyhow. Why two?
Of course, I followed the stream, and went for TEXT and VARCHAR for everything, since I don’t store binary data in the database. That may not be the optimal choice in all cases.
It turns out, that MySQL goes a long way to “help” the user with string operations. In particular, when the table column is defined as TEXT, VARCHAR and their derivatives, the database will compare strings as they would be understood by humans. And if that definition sounds ambiguous to you, you’re in good company: Different versions of MySQL compare text strings differently. For example, snipping leading and trailing whitespaces from the strings before comparing them: Some versions will do this, others won’t.
The bottom line is that if you change your MySQL server, tiny bugs may creep in. All these corner cases may behave differently. This is the classic case of some entry disappearing from a list of 53478, without anyone noticing.
Another issue to consider is character collation: When using TEXT, VARCHAR and friends, we also have that ‘Ö’ and ‘OE’ are treated as the same character (when German character set is used, among others). Just an example.
The solution: Make MySQL treat your data as a binary. A BLOB column type, for example. You loose all those extra “features”, but gain stability over database versions and flavors. That means that you have to handle all the case-insensitivity issues yourself, as well cleaning up the strings properly. With good practices, that’s not an issue. It’s a matter of if you want to take responsibility, or let the database iron those small wrinkles for you.
And finally: What about uniqueness in tables? Here’s a short session, using MySQL 4.0.24:
mysql> CREATE TABLE try (mydata TEXT, UNIQUE INDEX (mydata(20)) );
Query OK, 0 rows affected (0.00 sec)

mysql> INSERT INTO try(mydata) VALUES('Hello');
Query OK, 1 row affected (0.00 sec)

mysql> SELECT * FROM try WHERE mydata='hELLO';
+--------+
| mydata |
+--------+
| Hello  |
+--------+
1 row in set (0.00 sec)
This was pretty much expected: As a TEXT column, the comparison was case-insensitive. And of course, the capital “H” was saved in the table, even though that doesn’t matter in string comparisons.
But what happens if we want to add an entry, which violates the uniqueness, when considering the strings in a case-insensitive manner?
mysql> INSERT INTO try(mydata) VALUES('HELLO');
ERROR 1062: Duplicate entry 'HELLO' for key 1
As expected, MySQL didn’t swallow this. “Hello” and “HELLO” are the same, so they can’t live together when “mydata” is restricted as UNIQUE.
So let’s drop the table, and try this again, this time with a BLOB column. Spoiler: Everything is case-sensitive now.
mysql> DROP TABLE try;
Query OK, 0 rows affected (0.00 sec)

mysql> CREATE TABLE try (mydata BLOB, UNIQUE INDEX (mydata(20)) );
Query OK, 0 rows affected (0.01 sec)

mysql> INSERT INTO try(mydata) VALUES('Hello');
Query OK, 1 row affected (0.00 sec)

mysql> SELECT * FROM try WHERE mydata='hELLO';
Empty set (0.00 sec)
(why should it find anything? ‘Hello’ and ‘hELLO’ are completely different!)
mysql> SELECT * FROM try;
+--------+
| mydata |
+--------+
| Hello  |
+--------+
1 row in set (0.00 sec)

mysql> INSERT INTO try(mydata) VALUES('HELLO');
Query OK, 1 row affected (0.00 sec)

mysql> SELECT * FROM try;
+--------+
| mydata |
+--------+
| Hello  |
| HELLO  |
+--------+
2 rows in set (0.01 sec)
(No problems with the uniqueness: ‘Hello’ and ‘HELLO’ are not the same in a BLOB)
To summarize all this: Before choosing between TEXT or BLOB, ask yourself if you want the database to treat the string exactly as it is, or if you want some forgiveness regarding case, whitespaces and natural language issues.
For example, are you sure that you want the user name and password as text? In particular, would you like the password case-insensitive? Do you want HTTP links as text? The address itself is indeed case-insensitive to the web, but CGI arguments (everything after the question mark, if present) is case-sensitive (YouTube video IDs, for example).
Usually, using a text column is OK. But it’s a choice one has to make.
Some electronic imaging system dumped a 4:2:2 YCbCr raw image into a file. It’s a debug output. Now I wanted to see this image. GIMP doesn’t import that format. ImageMagick had the solution. It was as simple as
I don’t know why they picked the codename “pal” to represent 4:2:2 format (maybe because of ITU-R BT.601?) , but it did the job. Ah, they call it “YUV” and not “YCbCr”, but it was really close enough for me.
I reached that point, at which place and route sometimes met timing, and sometimes it didn’t. It was all a matter of playing with the placer cost table number. The FPGA guy’s gambling for lucky numbers.
The ISE tool (Xilinx’ native IDE) supports an feature called Multi-Phase Place and Route (MPPR for short), which basically means that the tools will run several phases of place and route, with different placer cost table figures. I never tried it, to be honest. Since I’m not very fond of IDE’s in general, and not using ISE in particular, I preferred to do it myself.
Besides, MPPR will run for a given number of times. I want the computer to loop until the constraints are met. No more, no less.
So here is the script I used. If you’re using Linux or Cygwin, it will be pretty easy to modify it for your uses.
#!/bin/bash

projectname=myproj
reportfile=$projectname.par
cost=1

while (( cost<100 )) && [ -e $reportfile ] && ! grep -q 'All constraints were met' $reportfile ; do
  rm -f $reportfile;
  C:\\WINNT\\system32\\cmd.exe /c start "" /b /low /wait par -intstyle ise -w -ol med -pl med -rl med -t $cost "$projectname"_map.ncd $projectname.ncd $projectname.pcf
  if ! grep -q 'All signals are completely routed' $reportfile ; then
    echo PAR seems to have failed. Stopping.
    exit 1;
  fi
  echo Done PAR with cost table $((cost++))
done;

echo Done.
Now, if you’re bothered by the line going
C:\\WINNT\\system32\\cmd.exe /c start "" /b /low /wait par -intstyle ise (...)
you may exchange it with simply
par -intstyle ise -w -ol med -pl med -rl med -t $cost "$projectname"_map.ncd $projectname.ncd $projectname.pcf
The only reason I use cmd.exe with all its parameters, is that I want the PAR process to run with a low priority. After all, I may want to do something else with my computer while this CPU hog is running.
Do you recognize the letters in the example image above? If you do, I suppose you’re a Hebrew speaker. And since the letters are shown in handwriting style, just a Hebrew keyboard is not enough, since the keys are marked with type-style letters. With basic Hebrew skills, the translation is obvious. Others will have to work harder.
This Captcha generator is intended to filter non-Hebrew speakers from Hebrew sites. Antisemitic forum spam is a well-known problem. While capthcas based upon digits solve the problem Israeli children face with English letters, a Hebrew letters captcha allow the Israelis in, and keep those who have nothing to do there anyway, out.
The software, which is released under LGPL (font under GPL) is a PHP script, which should run out of the box on any fairly updated web server.
Encoding issues (important!)
Your page must be encoded in either UTF-8, windows-1255 or ISO 8859-8. Otherwise, the user may enter the right code but will be denied access anyhow, because the browser messed up the Hebrew letters when submitting the form (and the code typed). It may work with other encodings, but it’s not recommended to gamble with this.
The good news are, that your page is most likely already encoded in one of these. The bad news are that you have to make sure that the browser doesn’t get confused.
Keep in mind, that unless the encoding is explicitly declared in HTML or by the HTTP headers, the browser will pick its own default, which depends on, well, everything. So if you don’t declare the encoding, the captcha will work for some and not for others, with no apparent explanation.
It’s common to declare the encoding with one of the following lines in the HTML code. Pick the one that doesn’t mess your page up. One of these lines should be between your <head> and </head> tags.
Hebrew has two special issues: It goes from right to left, and we have the special treatment of the last letter. To avoid problems, it’s recommended to tell users
to copy the letters from right to left (which the natural behavior)
not to alter the last letter (e.g. Mem to Mem-Sofit)
Please visit the the original site and read their documentation before attempting to install the Hebrew version. Both versions are virtually the same.
And if you have problems installing the Hebrew, please make sure that you manage to do it with the original version first.
The font used by default is “Ktav Yad” (which means “handwriting” in Hebrew) by Maxim Iorsh. Any TrueType font supporting hebrew will do, but you can download other free fonts at Culmus’ web site at SourceForge.
Having made several FPGA projects for my clients, I’ve learned that most of them are reluctant to use the Xilinx FPGA Editor. While most seem to realize that’s it’s a valuable tool, few really grasp the enormous advantage it offers, in particular when debugging FPGA designs: The possibilities to view the FPGA down to the level of the basic logic elements, as well as making small, yet arbitrary changes, without needing to go through place and route again. This opens for several techniques, which make a huge difference in the frustration of debugging, not to mention time.
Maybe because the documentation is currently somewhat laconic (anyone seen a good user’s reference manual?) most people skip this tool.
The video tutorial presented below should make you friends with the tool. It doesn’t cover nearly all functionality, but focuses on the things you need to get started, and also do a few useful things. It’s a private initiative, so Xilinx are of course not responsible for anything said in it. It was shot in December 2007, showing the tools of ISE 9.2.
Published on Youtube, the tutorial is given in three parts:
How to watch any signal within your FPGA design with a regular oscilloscope, almost as easy as in the pre-FPGA times, when all signals were physically exposed on the board.
Topics covered:
Opening a second List window
Finding the output pin to sacrifice for debugging
Disconnecting the output pin from its previous connection
Connecting the new net with the “Route” button
Routing the net to the IOB with the “Autoroute” button
A few words about skews
Briefly: About the “Probes” utility
Virtex-4 (and newer devices): A possible routing problem
Posted Under: FPGA
This post was written by eli on January 1, 2009 Comments (0)
I love LaTeX. It’s my preferred tool whenever I need to write a document in English. But it had one little problem: The documents it generated, even though beautifully typeset, had an academic look. For someone who submits the documents to hitec companies, an engineering-like look was more appealing.
So I wrote my own document style. It’s inspired from several technical documents, such as application notes and manuals which are published by large companies in the industry.
After downloading (and possibly updating TeX’s search cache), just change the well-known \documentclass{article} to \documentclass{hitec} and enjoy the new look.
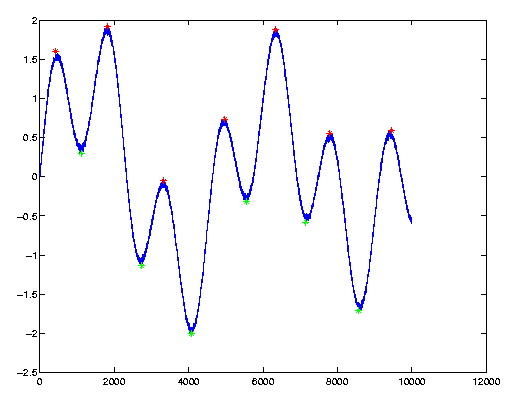
Here’s a problem I encounter in several fields: Find the local maxima and minima in some noisy signal, which typically looks like the following graph:
The local maxima and minima are plotted as red and green stars on the graph. To the eye it’s so obvious where they are, but making a computer find them can turn out tricky.
Let’s start with what not to do: Using the well-known zero-derivate method. Due to the noise, which is always there in real-life signals, accidental zero-crossings of the first derivate occur, yielding false detections. The typical solution is to smooth the curve with some low-pass filter, usually killing the original signal at the same time. The result is usually that the algorithm goes horribly wrong where it’s so obvious to the eye.
In many cases, we don’t really care about maxima and minima in the mathematical sense. We can see the peaks and valleys, and we want the computer to find them. This is what “peakdet” does.
The trick here is to realize, that a peak is the highest point betweem “valleys”. What makes a peak is the fact that there are lower points around it. This strategy is adopted by “peakdet”: Look for the highest point, around which there are points lower by X on both sides.
Let’s see an example: First, let’s create the graph shown in the figure above:
Now we’ll find the peaks and valleys: (you’ll need to copy the “peakdet” function from the bottom of this page and put it in your working directory or a directory in the MATLAB search path):
Note the call to peakdet(): The first argument is the vector to examine, and the second is the peak threshold: We require a difference of at least 0.5 between a peak and its surrounding in order to declare it as a peak. Same goes with valleys.
The returned vectors “maxtab” and “mintab” contain the peak and valley points, as evident by their plots (note the colors).
The vector’s X-axis values can be passed as a third argument (thanks to Sven Billiet for his contribution on this), in which case peakdet() returns these values instead of indices, as shown in the following example:
And from here we continue like before, but note that the X axis represents “t” and not indices.
>> hold on; plot(mintab(:,1), mintab(:,2), 'g*');
>> plot(maxtab(:,1), maxtab(:,2), 'r*');
As for the implementation of this function: The work is done with a for-loop, which is considered lousy practice in MATLAB. Since I’ve never needed this function for anything else than pretty short vectors (< 100000 points), I also never bothered to try speeding it up. Compiling to MEX is a direct solution. I’m not sure if it’s possible to vectorize this algorithm in MATLAB. I’ll be glad to hear suggestions.
A final note: If you happen to prefer Python, you could try this (someone has been kind enough to convert this function). There are also a version in C by Hong Xu and a version in FORTRAN 90 by Brian McNoldy. I haven’t verified any of these.
And here is the function. Copy and save it as ‘peakdet.m’. It’s released to the public domain:
function[maxtab, mintab]=peakdet(v, delta, x)%PEAKDET Detect peaks in a vector% [MAXTAB, MINTAB] = PEAKDET(V, DELTA) finds the local% maxima and minima ("peaks") in the vector V.% MAXTAB and MINTAB consists of two columns. Column 1% contains indices in V, and column 2 the found values.% % With [MAXTAB, MINTAB] = PEAKDET(V, DELTA, X) the indices% in MAXTAB and MINTAB are replaced with the corresponding% X-values.%% A point is considered a maximum peak if it has the maximal% value, and was preceded (to the left) by a value lower by% DELTA.% Eli Billauer, 3.4.05% This function is released to the public domain; Any use is allowed.
maxtab = [];
mintab = [];
v = v(:); % Just in case this wasn't a proper vectorif nargin < 3
x = (1:length(v))';
else
x = x(:);
iflength(v)~= length(x)
error('Input vectors v and x must have same length');
endendif (length(delta(:)))>1
error('Input argument DELTA must be a scalar');
endif delta <= 0
error('Input argument DELTA must be positive');
end
mn = Inf; mx = -Inf;
mnpos = NaN; mxpos = NaN;
lookformax = 1;
fori=1:length(v)
this = v(i);
if this > mx, mx = this; mxpos = x(i); endif this < mn, mn = this; mnpos = x(i); endif lookformax
if this < mx-delta
maxtab = [maxtab ; mxpos mx];
mn = this; mnpos = x(i);
lookformax = 0;
endelseif this > mn+delta
mintab = [mintab ; mnpos mn];
mx = this; mxpos = x(i);
lookformax = 1;
endendend